Excel How to Make Cell Text Continue to Next Cell
In this post, you'll learn what causes data to overflow into the next columns and how to keep text from spilling over in Excel.
When entering a long text in a cell, you may notice that sometimes it spills out into adjacent columns and at times gets hidden behind the neighboring cells. How does Excel determine what to do and how do you stop words from overflowing into next cells?
What causes words to spill over into other columns?
Knowing the circumstances under which text continues beyond the edge of the current column can help you better control the layouts of your Excel sheets. So, let's make up two lists.
Text is spilling over
For the cell content to overflow beyond the cell boundaries, all of the following conditions must be true:
- The cell value exceeds the width of the cell.
- The cell value is text. Long numbers are generally converted to scientific notation, and dates appear as ### when the column is not wide enough to display the date.
- Neither the current nor adjacent cell is merged.
- The adjacent cell is absolutely empty - does not contain spaces, non-printing characters, empty strings, etc.
- Wrap text is off.
Text is NOT spilling over
For text to be truncated at the cell's edge, any one of the following conditions must be true:
- The adjacent cell is not blank.
- Either the current or adjacent cell is merged.
- Wrap text is on.
- The Show Formulas mode is enabled.
- The cell's horizontal alignment is set to Fill.
Now that you know what things affect text overflowing, you can reasonably assume that fulfilling any requirement from the second list will prevent Excel cells from spilling out. And you are right! However, there is a small complication - all conditions but one would make some visual changes to the sheet. Which is the safe option that won't impact the spreadsheet's consistency in any way? Obviously, the last one. And the next section provides the detailed steps on how to implement it.
How to prevent text from spilling over in Excel
To keep Excel cells from spilling out into the next column, perform these steps:
- Select the cells you want to prevent from overflowing.
- On the Home tab, in the Alignment group, click the Dialog launcher (a small arrow in the lower-right corner of a group).
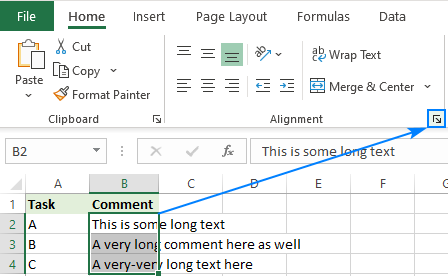
- On the Alignment tab of the Format Cells dialog box, choose Fill in the Horizontal drop-down list.
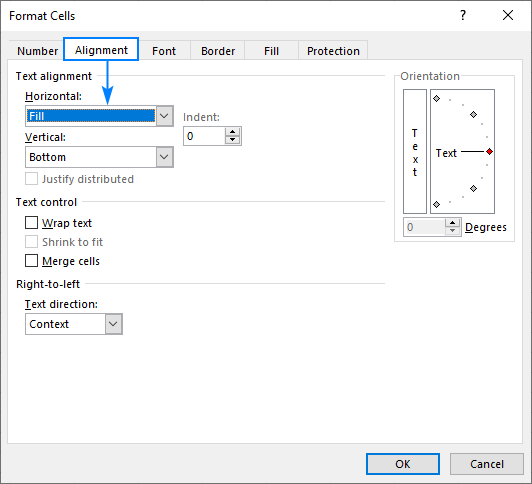
- Click OK to save the changes and close the dialog.
Now, the data in the selected cells is truncated at the cell boundary. 
Note. This method works correctly only if all of the selected cells spill out - in this case, the text will crop correctly. If some cell contains shorter text, Fill will populate an entire cell with the content, repeating it as many times as necessary. For example, a cell containing the word "Hey!" may look like "Hey!Hey!Hey!".
Stop words from spilling into next cells using Wrap Text
Those of you who know how the Wrap Text feature works in Excel may feel skeptical about this method. Indeed, turning wrapping on makes rows very tall: 
However, there is a small clever trick to avoid this effect! Before wrapping text, this is what you need to do:
- Select the cells you wish to stop from spilling over.
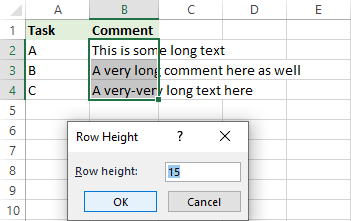
- On the Home tab, in the Cells group, click Format > Row Height.

- The Row Height box will appear showing the current height of the selected cells. Click OK without changing anything just to confirm your present row height. (In the latest versions of Excel, the default is 15 points on a 100% dpi. If you see a number other than 15, keep it - Excel row height is determined by the font size and may be different in your worksheet).
- On the Home tab, in the Alignment group, click the Wrap Text button:
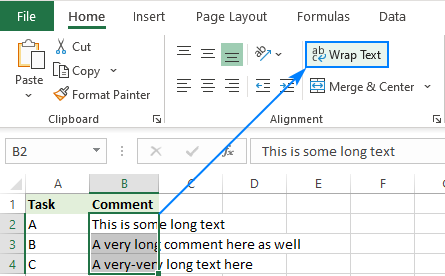
That's it! Using these two features together forces long text to be cut off at the cell edge. 
Tip. This also works in the reverse order. If you have already enabled Wrap Text and now want to get rid of tall rows, set the row height back to default (15 points) as explained above. The result will be normal rows that do not overflow into adjacent empty cells.
One more way to hide overflow text in Excel
And here's another amazingly simple way to keep long text within the cell boundaries - just type something in the neighboring cell. Don't want any extra data in your sheet? Type a space :) There are too many overflowing cells? Enter a space in a range or entire column to remove spill-over from multiple cells in one go!
Here are the steps to hide long text that overflows beyond the cell edge:
- Select a range of empty cells adjacent to the overflowing cells. Or select an entire column on the right (in case the whole column is empty).
- Type a space character and it will appear in the first cell like shown in the screenshot below.
- Without disturbing the selection, press Ctrl + Enter. This will insert a space in each cell of the selected range.
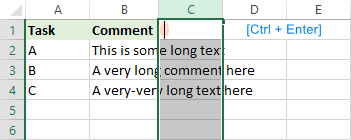
Done! The adjacent column still looks empty but no text flows into it from the left.
Keep text from overflowing into specific cells
In some situations, an additional hurdle may arise - some cells in the adjacent column may be filled with data while others are not. As the result, the contents of some cells will continue into the next column and beyond while other data will be limited to the visible part of their current cells. This tends to confuse things and makes quite an ugly view. 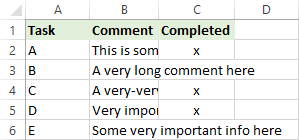
To resolve this case, enter a space only in blank cells of the column into which data is spilling (column C in our example). To quickly select blank cells, make use of the Go to Special feature:
- Select a range of cells or a whole column to the right of the overflowing cells.
- On the Home tab, in the Editing group, click Find & Select > Go to Special. Or press F5, and then click Special… .
- In the Go To Special dialog box, select Blanks and click OK.
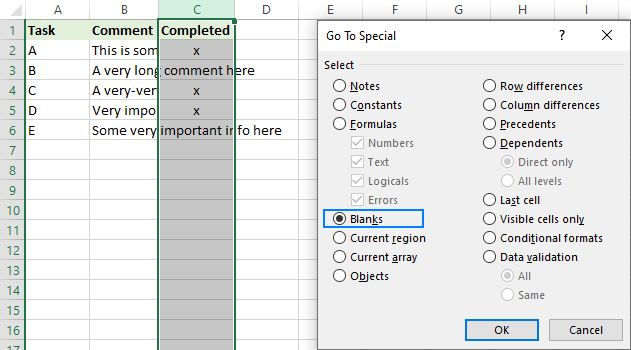
- With the blank cells selected, type a space character and press Ctrl + Enter. A space will be inserted in every selected blank cell.
Voilà, no data is spilling into the next columns even if an adjacent cell is empty (in fact, it does contain a space character, but who will know it? ;) 
Tip. The first two methods (Fill horizontal alignment and row height + wrap text) will also work in this scenario.
These are four quick and easy ways to remove cell's spill-over in Excel. I thank you for reading and hope to see you on our blog next week!
You may also be interested in:
johnsonyesseresels.blogspot.com
Source: https://www.ablebits.com/office-addins-blog/stop-text-spilling-over-excel/
0 Response to "Excel How to Make Cell Text Continue to Next Cell"
Yorum Gönder